Saturday, June 25, 2011

Malted Cherry Cheesecake

Cheesecake hasn't been the exclusive province of the dairy-eaters for many many years. Not since the first hippie threw some tofu and cashews and sugar into a blender before molding it into a perfect New York style cake have vegans pined for that formerly apparently unreachable. In fact, I think one of the fun things about being vegan is getting to surprise and delight omnis who believe that they have cornered the market of products and recipes that have been available to my kind for practically ages. I've had omnis ask me whether I miss chocolate. (It's vegan, bitch!)* Or ice cream. (Can you say Ice Bean, bitch?)* Or cream cheese. (You see where this is going, bitch?)* And it isn't always omnis who aren't aware of the progress we've made since we left the breast milk of cows for the baby cows, for whom it is a nutritionally perfect food.

All of this is a long way of saying that many vegans have scaled the mountain of cheesecake before me, so there isn't a lot of guesswork involved. No complicated methods or powders. No intricate series of heating and cooling, combined with gentle or vigorous agitation. No super expensive and weird ingredients. In fact, the major downside to making vegan cheesecake is really the cost involved. At the WF by my house, an 8 oz container of vegan cream cheese is $3. Given that the average vegan cheesecake calls for 24 oz of the stuff, that's $9 right there before you get to any other ingredients. Maybe that won't bother some people, but the chronically underemployed (Holla!) get a bit wary.

While you're splurging on cream cheese, though, you might as well pony up for some more of those fresh cherries. Break out your chopstick again, if you were short-sighted enough not to pit enough last time to see you through this next endeavor. If you have any friends just standing around, use your Vegan Domination Card to conscript their idle hands to this critical service. One chopstick, three bowls, and two nimble hands is all it takes to convert a bowl of fresh cherries with stones into one without.


This particular cheesecake is a delightful configuration of three different recipes drawn from different sources and combined to create a delicious and decadent summery confection. I halved the recipe for cheesecake, which produced a creamy layer of just the right thickness and topped it with a lush layer of homemade cherry pie filling. You could, of course, buy a can of pie filling, but that stuff is always packed with chemicals, corn syrup, red dye, and preservatives. Making your own is super fast and easy, as soon as you get those cherries pitted. The malted crust from the genius brain of Hannah Kaminsky ties the whole thing together beautifully. The flavors in this crust are more complex than what you get in a traditional graham cracker crust, and I really enjoyed the caramelly base notes of the malt accenting the sweetness of the cherries.

First, make Hannah's recipe for Malted Pastry Crust:

Malted Pastry Crust:
1 2/3 Cups All Purpose Flour
6 Tablespoons Cup Barley Malt Flour/Powder
2 Tablespoons Dark Brown Sugar, Firmly Packed
Pinch Salt
6 Tablespoons Non-Dairy Margarine, Chilled and Cut into Pieces
6 Tablespoons Vegetable Shortening
2 Teaspoons Plain Soy or Coconut Yogurt
1 – 2 Tablespoons Water, Ice-Cold
 My shortened, sloppier directions are as follows: In a large bowl, combine flour (I used whole wheat pastry, not AP), barley malt powder, sugar, and salt. Cut in margarine (I used 12 T margarine instead of 6 margarine and 6 shortening because I didn't feel like buying both) until you have pea-sized bits. Add yogurt. Mix in ice water by dribs and drabs until the dough holds together. Press into the bottom and sides of a 9inch springform pan. Set aside.

Preheat your oven to 325 and make half of this cheesecake recipe:

¾ cup, + 1 Tablespoon sugar
¾ cup non-dairy yogurt
¼ cup all-purpose flour
2 Tablespoons non-dairy milk
1 ½ teaspoons lemon juice
1 teaspoon vanilla extract
¼ teaspoon salt
24 oz Tofutti (or similar brand) imitation cream cheese (3, 8oz containers)
 You can halve recipes all on your own, right? Pour the cheesecake mixture evenly into the prepared crust. Bake for about 1 hour. It's okay if it looks a little jiggly when you take it out of the oven. It will firm up as it cools. When the cake is approaching room temperature, cover and chill.

Prepare cherry pie filling:

4 cups fresh, pitted cherries
1/4 c cornstarch
pinch salt
1/2 c raw sugar
1 1/2 c pomegranate juice
juice from 1 lemon (omit if using sour cherries)

In a medium saucepan, combine sugar, salt, and cornstarch. Then add everything else and cook over medium heat until thick. Cool thoroughly.


Spread cherry filling on cheesecake and chill until ready to serve. Marvel at the wonders of vegan cookery and shed a few tears at the blenders full of tofu and cashews that came before you. They sacrificed everything, so that you could have this cake.

*Apologies to my tender-eyed readers for the swears. We just finished watching the third season of Breaking Bad. In addition to being a-maaazing, it has littered my speech with "bitches." Don't worry. It will pass.

Saturday, June 11, 2011

Fresh Cherry Pie

The universe is a dark place, dear readers. A howling, godless wasteland in which we are adrift, tossed about like rudderless boats among the wreckage of other lives. The howl of a bleak monad on an even bleaker bridge echoes in the chasms of an indifferent world. Given such desolation, we can do better than debate the meaning of ethics in a world without punishment or salvation. We can do SO much better. We can make fresh cherry pie. It's true that pitting fresh cherries is labor intensive. It takes time and effort, and those without the benefit of a cherry pitter will suffer more than those with one. What is this, other than further proof of the way that an indifferent universe doles out its sweetness and benefit? But you already know this. You have resigned yourself to a life of pitting cherries with a chopstick. Of cajoling your reluctant partner to man up and grab a chopstick of his own. Of defiantly resisting the siren song of those bags of frozen pitted cherries, relying on the sweat of your brow to make your sweet reward. Really, in a world like ours, what else do you have to do?

Fresh Cherry Pie

1 batch pie dough (enough for a top and bottom crust)
5 c fresh, pitted sweet or sour cherries (goddamnit! I can't find sour cherries anywhere in NorCal!)
1 c raw, organic sugar (keep it vegan, y'all)
1 t salt
juice from 1/2 lime
2 T margarine
4 T tapioca flour/starch


Preheat oven to 450. Line pie pan with half of dough. In a large bowl, toss cherries with sugar, salt, lime juice, and tapioca, then dump the lot into pie pan. Dot cherries with little chunks of margarine. Roll out remaining dough and arrange into a lattice topping. Sprinkle pie with a bit more sugar. Bake at 450 for 10 minutes. Reduce heat to 350 and bake for 40-50 minutes more, or until crust is golden and the pie juices are thick and bubbly. NB: Fresh berries release a veritable boat load of juice when baked. After 30 or 40 minutes, if your pie looks like a lake of fruit juice, let it cook longer. The tapioca thickener should catch up with the liquid and thicken up nicely. All we have is each other, dear readers. And fresh cherry pie.

Also, how badly do I need to re-do my blog design? Bad, right? I know.

Wednesday, June 8, 2011

Lemon Peppery Pea Soup

To be a food blogger of any consequence, one must at some point make a claim for having a dish that "tastes like summer!" Such a dish inevitable relies heavily on seasonal produce, sometimes fresh herbs, and almost always lemon. I'm not without my own sentimental streak about such things. When I decided to make pea soup, I consciously wanted to create something that would taste like sunshine and leisurely afternoons, though I have had neither of these for a while. And c'mon! Pea soup should at least make the short list for foods that can be justifiably described synaesthesiastically (new word!) as "summer." What I came up with actually tasted more wintery to me, perhaps due to my heavy-handed use of pepper. I didn't mess up, dear readers, I've just really been feeling the peppercorns lately. I also decided to leave half the peas whole, which is a bit unconventional in a blended vegetable soup. The extra texture was welcome, particularly after C proclaimed his (hitherto unknown) disinclination for smooth soups. I can kind of see where he's coming from. I think the critical factor in smooth soups, aside from flavoring (duh) is consistency. Too thin, and they're unpleasantly watery. Too thick, and, well, "blorf" is the word that comes to mind. "Babyfood" is another.

I'm sure I will play with this soup more with time, but this recipe is a good baseline. I really like the lemony peas laced with the smokey zing of pureed peppercorn. I wouldn't call it the "ultimate" or even "penultimate" soup of summer, but it fits neatly into the sort of gloomy, lingering Spring we've been enjoying in Northern California. Consider making this on a chillier-than-usual summer day, or a warmer-than-usual day in winter. I love a good contradiction.

Lemon Peppery Pea Soup

2 (16 oz) bags frozen peas (I know fresh would have been better, but they tend to be a) more expensive, and b) more work than I could handle on this particular day. By all means, use fresh.)
1 small Vidalia onion, diced
1-3 t whole black peppercorns (depending on your tolerance of/love for pepper)
3 c water
1 cube broth
2 T dried dill
1 T dried basil
10 fresh mint leaves, chopped
juice from one lemon
salt to taste

In a medium saucepan, saute onion in a bit of olive oil until translucent. Add one bag of peas, herbs, and peppercorns and cook for 5 minutes. Don't let it stick!. Dump the peas/onion/pepper mixture into a blender or food processor. Add 2 cups of the water and blend until smooth. Return to pan. Add final cup of water and remaining ingredients. Cook over low heat for 10-15 minutes, adjusting seasonings as necessary. If you're one of those people who can't abide a pureed soup without a swirl of some kind of dairy analog, by all means add a dollop of soy yogurt or sour cream before serving.

Tuesday, May 31, 2011

Vegan in Bulgaria

I already blogged about my food experiences in Eastern Europe over at Vegansaurus, much to my delight, so now I just want to share some of my favorite pictures from the trip. Though it may betray a certain naivete about the way that teh internets work, I'm disinclined to post these photos on facebook. I am actually disinclined in general to post any pictures to facebook, though I realize this is minority opinion. I'm not criticizing those folks; it's just not my way. Instead, I want to showcase just a few of the best ones here, so that my friends and loved ones and anyone interested who follows my blog can check them out. If you don't already read Vegansaurus--I'm a guest blogger now!--you should check out my pics below and then head over to their site. Now to the pics. And bear in mind that I was there for two weeks and visited five cities. As a photographer, I am the very soul of restraint.

View from our hotel in Bansko.

Could this scene look any more Eastern European? Oh, except for me standing there.

The central square fountain in Plovdiv.

Coffee and freshly squeezed orange juice. I actually know how to order this in Bulgarian.

Underground ruins in Plovdiv. I framed this shot carefully, so you can't see all the cigarette butts, plastic bags, and soda cans.

A very old ampitheater, also in Plovdiv, where they still have live performances. Not when we were there, obviously, unless you count a random American girl who belted out "Amazing Grace" while standing on the stage.
A guy selling nuts outside the Bachkovo Monastery. If you're familiar with Elizabeth Kostova's novel, The Historian, then you've read about this place. I couldn't get a good shot of the monastery itself because they don't allow photography inside the walls, so just imagine some Eastern Orthodox priests milling around behind me, carrying incense and chanting. It WAS Easter, after all.

After a long day of walking, I found a little peace at this bar with a lovely, completely empty, lilac-surrounded beer garden. I don't think my picture really captures the soft, filtering sunlight, and it definitely doesn't capture the bird sounds and the gentle, lilac-scented breeze.  It really was a little piece of heaven.

So....why do they call it the Black Sea? This is the beach in Burgas (sometimes spelled Bourgas). It was much chillier on the coast than further inland, which seemed a little counter-intuitive to people from a mountain state in the U.S. In the summer, by all accounts, this place is slamming with tourists and locals.

When you see a statue of Pushkin, you take a picture of it. I don't make the rules.

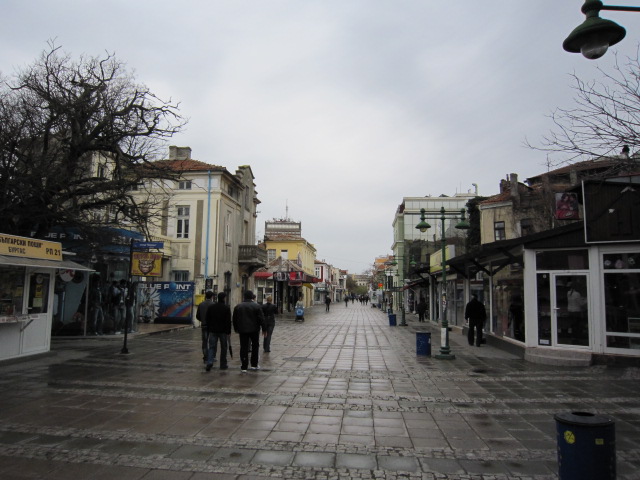
Downtown Burgas. It was drizzly for most of the time we were there, but the town was lovely.

The valley and fortress of Tsaravets in Veliko Turnovo. Impressive, right?

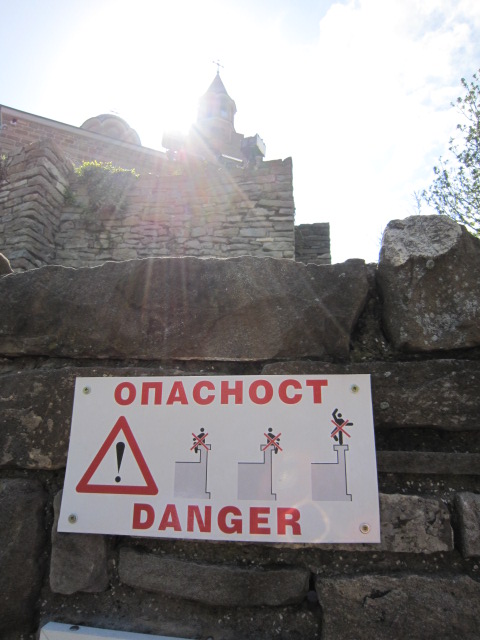
Pirouetting on castle turrets can be hazardous to your health.

Ruins, fortress, blah blah blah.

The Bulgarian peasants were extremely grateful to their Soviet liberators. 


That's it! Well, not really. I have loads more pics, but I tried to choose judiciously. My next post will be about food. I promise.

Saturday, May 28, 2011

Chili Dogs!

 Sometimes, dear readers, you just have to unleash your inner  junk food fanatic--that (not so) tiny corner of your psyche that would like to subsist year round on waffle fries and funnel cake. You know the one I mean. On such occasions, you could do substantially worse than to throw that fanatic a fat plate of messy, delicious chili dogs. If you're psycho, like I am, you will mitigate the unhealthiness of such a meal by using sprouted wheat hot dog buns and almost fat-free vegan chili. You can then make up for the lack of fat by dousing the whole thing with shredded vegan cheese. Then you will take another three steps back and serve them with a fresh, raw cabbage salad rather than cheese-fries or nachos. That's how it is when you try to have an adult conversation with your inner, screaming toddler. You're doing the right thing, and that toddler is howling its head off, demanding cheesy poofs. At such moments, you should just shut up and serve the chili dogs. Nobody, not even a petulant, psychically-insufferable rugrat, can talk with a mouth full of chili dog. Here's how it's done:

First, make the chili. You could, of course, just buy a can of chili. But I can almost guarantee that it won't be as good as what I'm about to describe. Also, canned chili is kinda 'spensive. And kind of crap. And it comes in a can, which is totally lame. Why not make your own?

Chili for Dogs

1 c tvp, dry
1 c lentils, dry
1 veggie broth cube--I could reasonably be accused of an over-reliance on these.
3 c water
1 medium sweet onion, diced
1 medium green pepper, diced
1 8 oz can tomato sauce (shit! I was just making fun of cans)
2 T dried oregano
1 T chili powder
1 T chipotle chili powder (or less, if you're a bit of a ninny)

In a large pot, saute onion and pepper in a bit of olive oil until just translucent. Add spices, tvp, and lentils. Saute one minute more. Add broth cube, tomato sauce, and water and bring to a low boil. Reduce heat and cover. Cook for about half an hour, checking frequently. As with the Mexican lentil recipe, the recipe for which is shockingly similar to the above, you may need to add a bit more water toward the end to keep it from sticking. Just go with the flow. You can't mess this up. It's impossible.

Hopefully, you started the chili no more than 45 minutes to an hour before you wanted to eat. If you decided to be a super chili-overachiever, and you thought you'd get out ahead of this whole chili dog affair by starting first thing in the morning, then at this point you'll need to cool the chili and reheat it before you want to eat. Try not to be too rough on yourself. We've all been there. About 15 minutes before you want to eat, preheat your oven to 450. You now need to assemble your chili dogs.

Chili Dogs!

1 pkg vegan hot dogs--I strongly recommend the Yves brand. I don't like the texture of Tofu Pups and the Lightlife brand products frequently contain egg whites, whereas Yves is reliable vegan. Support vegan businesses!

hot dog buns--Like I said, we used a sprouted variety, but any vegan kind will do.
Vegenaise--or your favorite egg- and dairy-free mayo
1 batch chili, obvs
shredded vegan cheese--I used Follow Your Heart because I had some left over from another recipe. I think you all know that my heart actually belongs to Daiya.
tabasco--This is really only necessary if you're making them for someone like C, who now eats freaking EVERYTHING with tabasco. I might bake some into his next birthday cake. That'll teach him.

Assemble. Split the buns open, with a knife if necessary, and arrange on a baking sheet. Let these heat up in the oven and toast slightly for about 5 minutes. Remove from oven. Spread the bottom buns with a smear of vegenaise and top with a hot dog. You could even use two hot dogs per bun if you wanted to be totally crazy. I also split the hot dogs length-wise to maximize the chili-to-hot dog ratio in each bite, but you do what you want. Slather the dogs in chili and sprinkle generously with cheese. Pop the dogs under your broiler for just a few minutes until the cheese is melted and bubbly. Having enjoined you on multiple past occasions to watch anything you put under the broiler like a freaking hawk, I won't repeat those warnings here. Because you know how dangerous broilers can be. Really, turn your back for just one second and all of your labors could transform into a stinking, charred mess. But you know this.

We ate these with the aforementioned coleslaw because we're crazy for crucifers. If you aren't similarly hampered, perhaps some tater tots? C reminds me to mention that he particularly enjoyed his with some pickle relish. 

Next Up: Pictures from Bulgaria, whether you want to see them or not!

Wednesday, May 25, 2011

Mexican Lentils

 I have been living in a lentil desert, dear readers, and I didn't even realize it. I'm tempted to claim some kind of temporary insanity for completely forgetting--for months (MONTHS!) on end--how much I love them. Now, on the heels of this relentless pining for foods flavored with chili powder, a malady from which I've suffered ever since I returned from the wilds of Eastern Europe (pics are coming! I swear.), I've rediscovered them. The following recipe is simple, hearty, and delicious, if mildly unsurprising. Oh, and healthy! And relatively cheap! It has many good qualities. Basically, this came about because I wanted taco salad. C and I try to avoid eating lots of chips--not because we don't love them, but because we do...too much, so I have long had my own spin on this familiar dish. My version involves one or two types of smokey protein, like refried or stewed beans and taco-seasoned veggie crumbles, layered on a bed of blanched kale and topped with tomatoes, raw onions, cheese, avocado, sour cream, salsa, etc. Somewhere in this planning phase, I remembered our friend, the humble, hard-working lentil, and I realized that some nicely-seasoned lentils would be a perfect stand-in for our usual bean and tvp combo. And I was so right. Have these like we did in a taco salad, using whatever configuration you prefer. Or you could eat them on tostadas. Or even as a hearty dip. Or in burritos. Or even by themselves.

Mexican Lentils

1 1/2 c uncooked brown lentils
3 c water
1 cube veggie broth
1 medium sweet onion, diced
1 red pepper, diced
1 T garlic powder
3 T chili powder
1 T basil
1 T marjoram
salt
olive oil

In a medium saucepot, saute pepper and onion just until a bit translucent. Add the lentils and spices, and cook one minute more. Add the water and broth cube. Bring to a low boil, then reduce heat and cover. Cook for about 30 minutes, until lentils are soft. Adjust seasonings as necessary. You may find as the lentils are cooking that they need a bit more water. This is mostly a function of how hot your stove is. Fear not. Just add a bit more water to keep them from burning. 

Up next: Chili Dogs. Holy shit.

Tuesday, May 17, 2011

Tostadas and Carrot Soup

Are you feeling the lack of posts, dear readers? Maybe just the tiniest bit? Rest assured that being so remiss takes its toll in myriad little ways. Since returning from Bulgaria just over a week and a half ago--or so, it was something like that, but now the time is all mushing together into a gigantic ball of things I'm supposed to do but haven't yet, I've made exactly one meal worth blogging about. And, really, the meals of note increase in direct proportion to the amount of time I am not working or otherwise engaged. Hint: If you have a vested interest in seeing more blogs per month from me, the most efficacious possible strategy would be to make it so that C gets a killer job making six figures in his chosen field. Should this happen. I will happily and gleefully rest on my laurels and spend the foreseeable future writing about veganism and food and politics and horror films. It sounds like heaven. So make it happen, okay? Okay?

Until then, I want to tell you about one meal I made that was, if I do say so myself, pretty damned good. In general, if I'm going to the trouble of making soup, particularly one that involves the blender in any capacity whatsoever, I'm inclined to let the rest of the meal kind of coast. I'll throw in some beans, steam up a kettle of kale, and call it a day. When I cooked up the plan for this carrot soup, though, I wanted to do a little something extra. It may be because while I was in Bulgaria, I started fiending for tortilla soup in a way that wasn't assuaged until I returned and made a big pot of it. As maybe a hangover of that impetus, I decided to fit the sweetness of the roasted carrots in this soup into a general theme of Mexican deliciousness.

Roasted Carrot Soup 2.0 (without cashews, cuz who needs 'em?)

2 lbs carrots, washed--about 8-10 carrots
1 medium sweet onion
sea salt
black pepper
garlic powder (optional)
3 cubes veggie broth
6-7 cups water
3-4 T dried basil
1 T dried mustard
olive oil

Preheat oven to 375. Slice carrots and onion thinly, then spread them on a baking sheet. Drizzle with olive and oil and sprinkle with salt, garlic powder, and pepper. Roast for 30 minutes or until tender throughout, checking and stirring frequently. Process carrots with some of the water until smooth, working in batches as necessary. Collect processed carrots in a soup pot. Add remaining water, veggie broth cubes, basil, and mustard. Simmer for 30 minutes, stirring frequently. Adjust seasonings and thickness (by adding water) as necessary.


This recipe made enough soup for us to eat over three days, and, with the magical property belonging to all soups worth their salt, it only got better with time. On the first day, though, we had this soup with Lazy Tostadas (recipe follows) and some sauteed red cabbage because we are seriously, unrepentantly manic about our cruciferous veggies.

Lazy Tostadas

Corn tortillas
Refried beans
Prepared taco filling
Salsa
Avocado
Canola oil
Shredded vegan cheese (I used Follow Your Heart)

Preheat oven to 400. Brush tortillas with a thin coat of canola oil and bake until just crispy. They're going back in the oven, so no need to get super aggro about their crispness. You want them a little underdone at this point. Spread each tortilla with some refried beans, then top with taco filling, salsa, and cheese--in that order. Slide the tostadas under the broiler for just a few minutes, until the cheese gets melty. (Be vigilant at this stage! Broilers are useful, but if you're not careful, they will mess you up.) Let the tostadas cool slightly, then top with sliced avocados and serve.

Also, I'll put up a post soon with some of the highlights of my trip, including food pictures. Why would I go all the way to Eastern Europe and not take photos of what I was putting into my face?